Adding clouds to a cake is one of the most enchanting ways to elevate your baking game. Whether it’s for a birthday, baby shower, or a whimsical dessert table, cloud designs bring charm and elegance to any occasion. But how do you put clouds on a cake? In this article, we’ll cover everything you need to know, from the tools required to techniques like buttercream piping, fondant shaping, and airbrushing. You’ll also learn creative tips, troubleshooting advice, and how to mix and match methods for a picture-perfect result. Let’s dive in!
Introduction to Cake Decorating with Clouds
Why Add Clouds to Cakes?
Cloud-themed cakes have gained popularity for their dreamy and versatile designs. These cakes work beautifully for:
- Special Occasions: Baby showers, gender reveals, and kids’ birthdays.
- Elegant Themes: Weddings, anniversaries, or celestial parties.
- Creative Inspiration: Cloud cakes allow bakers to experiment with textures, colors, and decorations.
Adding clouds isn’t just decorative—it creates a story. The light, fluffy look of clouds adds whimsy and can be paired with elements like rainbows, stars, or even airplane toppers to fit the theme.
Overview of Techniques to Create Cloud Effects
For those wondering, how do you put clouds on a cake, there are multiple approaches to consider. Here’s an overview:
- Buttercream Piping:
- Best for soft, fluffy, and three-dimensional clouds.
- Perfect for beginners with basic tools.
- Fondant Shaping:
- Offers a polished, smooth look for professional results.
- Ideal for detailed designs and sturdy decorations.
- Airbrushing:
- Creates realistic, dreamy clouds with seamless blending.
- Great for adding depth and dimension to your design.
Understanding these techniques helps you choose the best method based on your skill level and the look you want to achieve.
Preparing to Add Clouds to Your Cake
Creating a beautiful cloud cake starts with preparation. From selecting the right tools to choosing the perfect cake base, preparation ensures your design comes to life smoothly. So, how do you put clouds on a cake? It begins with setting the stage for success.
Essential Tools and Materials
Having the right tools makes all the difference when decorating a cake with clouds. Here’s what you’ll need:
- Piping Bags and Tips:
- Use round or star piping tips for buttercream clouds.
- Disposable piping bags make cleanup easier.
- Fondant and Shaping Tools:
- Fondant cutters, smoothers, and edible glue are must-haves for precise cloud shapes.
- Edible Colors and Airbrush Machine:
- Airbrushing tools allow for realistic cloud effects with gradients of blue and white.
- Turntable and Offset Spatula:
- These provide stability and control while decorating.
With these essentials in hand, you’ll be ready to tackle any cloud design.
Selecting the Right Cake Base
The cake base plays a crucial role in how your cloud design will stand out. Light-colored bases work best for contrast, allowing the clouds to pop.
- Layer Cakes:
- Perfect for taller designs where clouds cascade down the sides.
- Sheet Cakes:
- Ideal for simpler, flat designs, especially for beginners.
- Choosing Flavors:
- Vanilla, lemon, or coconut cakes complement the cloud theme with their light, airy texture and flavor.
By starting with the right tools and cake base, you set a strong foundation for decorating.
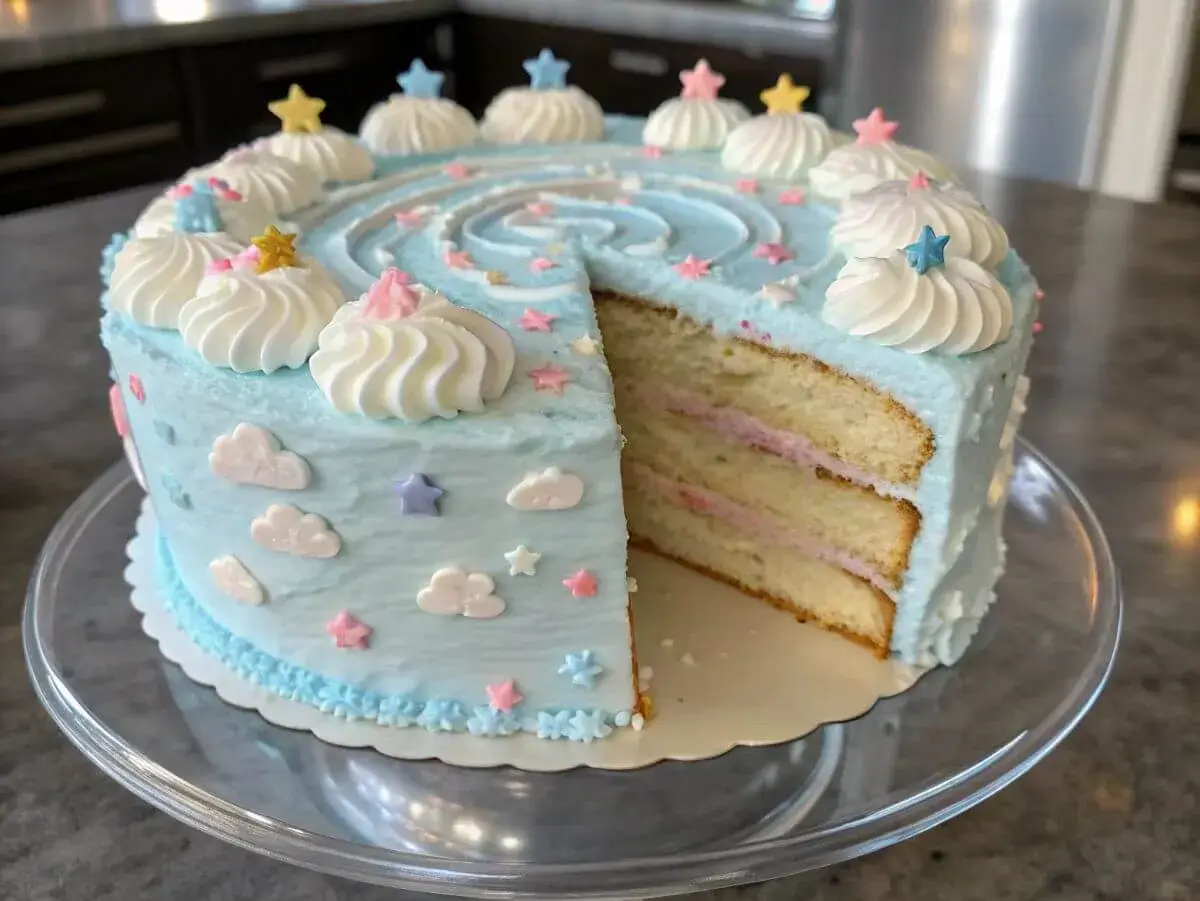
Buttercream Techniques for Cloud Designs
Buttercream is a versatile medium for creating clouds on a cake. It’s easy to work with, making it a great choice for bakers at any skill level. Let’s explore how do you put clouds on a cake using buttercream techniques.
Choosing the Right Buttercream Consistency
Getting the right buttercream consistency is key to achieving fluffy, realistic clouds.
- Smooth and Stable:
- Use a medium-stiff consistency to hold its shape without melting.
- Whipped Buttercream:
- Adds a light, airy texture that mimics real clouds.
You can adjust the consistency by adding small amounts of milk or powdered sugar as needed.
Step-by-Step Buttercream Cloud Piping
Creating buttercream clouds is straightforward with these steps:
- Fill Your Piping Bag:
- Use a round tip (size 10–12) or a star tip for fluffy edges.
- Start Piping:
- Hold the piping bag at a 90-degree angle to the cake’s surface.
- Squeeze gently to form a puffy shape, then release pressure before lifting.
- Blend Edges:
- For a seamless look, use an offset spatula to soften the edges of your clouds.
- Layer for Depth:
- Pipe smaller clouds on top of larger ones to create dimension.
By mastering these buttercream techniques, you’ll add soft, dreamy clouds to your cake effortlessly.
Using Fondant for Cloud Decorations
Fondant is a fantastic option for creating polished, professional-looking clouds on cakes. Its pliable texture allows for intricate designs and a smooth finish that’s perfect for themed cakes. So, how do you put clouds on a cake using fondant? Let’s break it down.
Crafting Fondant Clouds
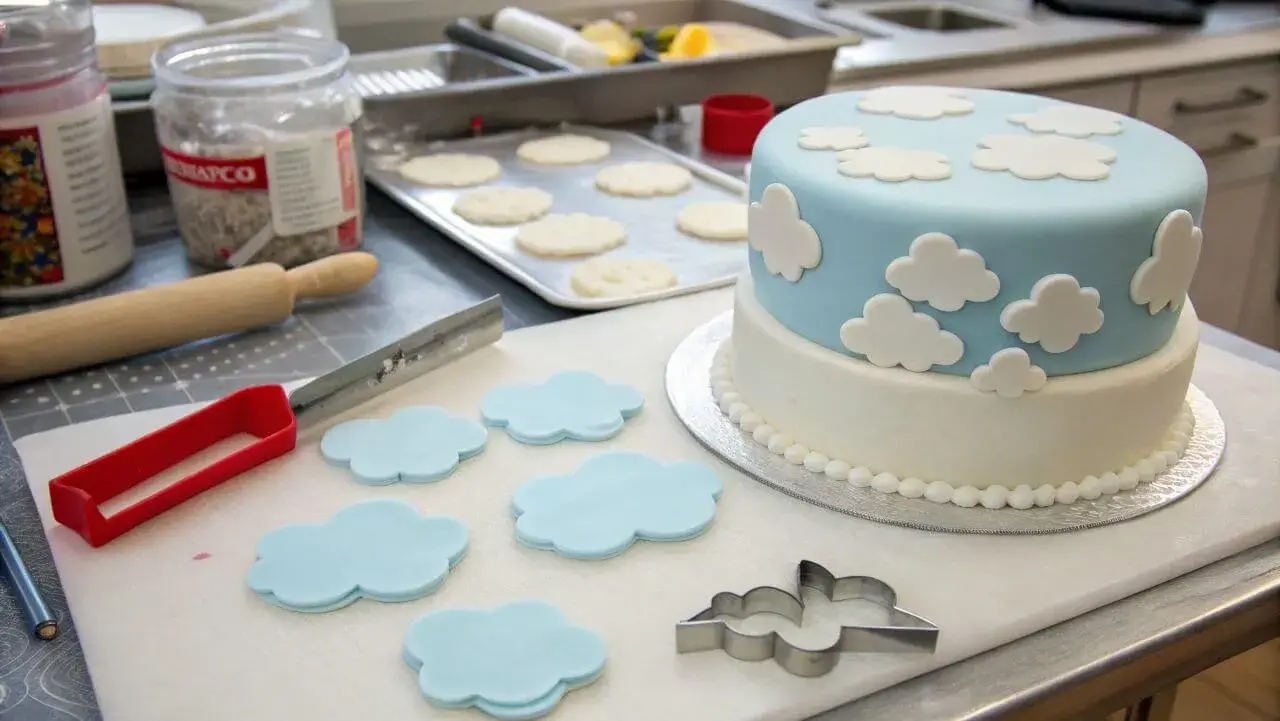
Follow these steps to shape and decorate fondant clouds:
- Prepare the Fondant:
- Knead the fondant until it’s soft and pliable.
- Add a few drops of white gel food coloring for a bright finish.
- Cut Out Cloud Shapes:
- Use cloud-shaped cutters or freehand shapes with a knife for unique designs.
- Roll the fondant to about ¼-inch thickness for sturdy decorations.
- Attach the Clouds to the Cake:
- Use edible glue or water to stick the clouds onto the cake surface.
- Arrange the shapes to create a layered, whimsical effect.
Enhancing the Fondant Clouds
To make the clouds stand out, consider these enhancements:
- Add Edible Glitter: Sprinkle a touch of glitter for a magical effect.
- Use a Texturing Tool: Create fluffy patterns by gently pressing a textured tool onto the fondant.
Fondant clouds bring a clean, elegant look to your cake, making them ideal for weddings or formal events.
Airbrushing for Realistic Cloud Effects
If you’re looking to achieve dreamy, realistic clouds, airbrushing is the way to go. It’s a technique often used by professionals, but with practice, anyone can master it.
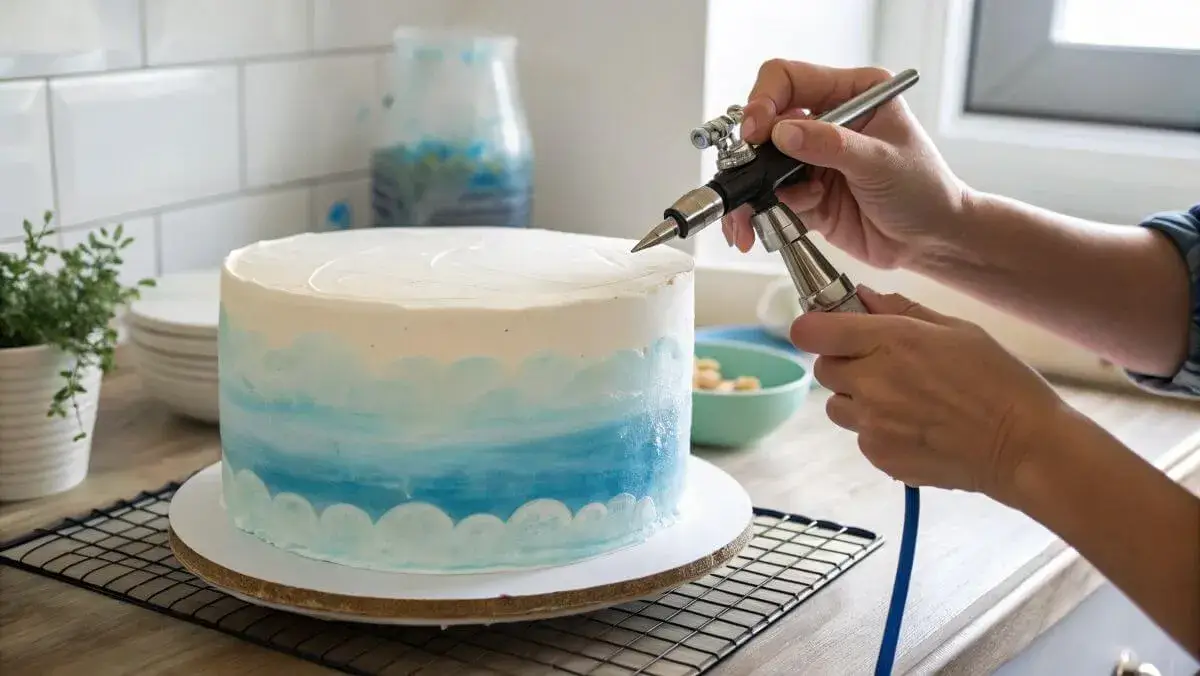
Airbrushing Essentials
To start, you’ll need:
- Airbrush Machine and Compressor: Choose a model suitable for cake decorating.
- Edible Food Colors: Use shades of white and blue for a sky-like effect.
- Practice Surface: Test your technique on parchment paper before working on the cake.
Step-by-Step Airbrushing Guide
- Prepare the Cake Surface:
- Smooth the buttercream or fondant base to create an even surface.
- Start with Blue Gradients:
- Begin with a light blue shade for the sky.
- Gradually build up darker tones to create depth.
- Add White Cloud Layers:
- Use a stencil or freehand airbrushing to create soft, fluffy cloud shapes.
- Blend the edges for a natural, seamless transition.
- Finishing Touches:
- Highlight the clouds with a touch of pearl sheen for a luminous effect.
Airbrushing adds dimension and a realistic touch to your design, making your cake truly mesmerizing.
Creative Combinations of Cloud Techniques
Sometimes, combining multiple decorating methods is the best way to achieve a unique, eye-catching design. So, how do you put clouds on a cake with a creative twist? By mixing buttercream, fondant, and airbrushing, you can create depth and dimension that will amaze your guests.
Layering Buttercream and Fondant
Using both buttercream and fondant allows for a dynamic, textured look that combines softness with polish. Here’s how:
- Start with a Buttercream Base:
- Pipe fluffy clouds using the techniques discussed earlier.
- Focus on the sides of the cake for a cascading effect.
- Add Fondant Details:
- Place fondant clouds on top of or around the buttercream.
- This layering creates a multidimensional effect that looks artistic and professional.
- Highlight with Airbrushing:
- Use an airbrush to add light blue shading around the fondant and buttercream clouds.
- This step blends the two styles seamlessly.
Combining these techniques ensures your cake stands out with textures and details that delight the eye.
Adding Toppers and Accents
Enhance your cloud cake by adding themed toppers or edible accents:
- Gold Stars or Sprinkles: Perfect for celestial or dreamy themes.
- Edible Balloons or Rainbows: Ideal for children’s parties or whimsical occasions.
- Personalized Toppers: Use names or messages that complement the cloud design.
These details add character and make your cake memorable.
Troubleshooting Common Challenges
Creating cloud cakes can sometimes come with its challenges, but don’t worry! With a few tips, you’ll overcome any issues and achieve stunning results.
Fixing Buttercream Issues
If your buttercream isn’t cooperating, here’s how to fix common problems:
- Clouds Look Flat:
- Use a thicker consistency to help clouds hold their shape.
- Refrigerate the buttercream briefly if it’s too soft.
- Edges Are Messy:
- Use an offset spatula to smooth edges.
- Pipe a second layer to refine the design.
Working with Fondant
Fondant can be tricky, but these tips will help:
- Fondant Cracks:
- Knead in a small amount of shortening to restore elasticity.
- Clouds Won’t Stick:
- Apply edible glue or a dab of water to adhere fondant securely to the cake.
Airbrushing Challenges
Airbrushing takes practice, but these solutions will help you avoid pitfalls:
- Overspray Issues:
- Shield areas of the cake you don’t want to color with parchment paper.
- Uneven Clouds:
- Keep your airbrush moving to maintain smooth, consistent shading.
With these troubleshooting tips, you’ll have the confidence to tackle any cloud cake design.
FAQs About Cloud Cake Decoration
Creating cloud cakes comes with many questions, especially for beginners. Here, we address some common queries to make the process smoother and more enjoyable.
How Do You Make a Realistic Cloud Shape?
A realistic cloud shape depends on the technique you use:
- Buttercream: Pipe with a round or star tip, layering different sizes to mimic fluffy clouds.
- Fondant: Roll the fondant unevenly and shape it by hand or use a textured tool for a natural effect.
- Airbrushing: Add depth by layering shades of blue and white, blending them for a soft, cloudy look.
By experimenting with these techniques, you’ll find the perfect method for your design.
Can I Use Vegan or Dairy-Free Alternatives?
Yes, there are plenty of options for vegan and dairy-free cloud cakes:
- Buttercream: Swap butter with plant-based margarine or coconut oil.
- Fondant: Many store-bought fondants are already vegan, but check the label to be sure.
- Edible Colors: Choose natural, vegan-friendly food coloring for the same vibrant results.
These substitutions allow everyone to enjoy your beautiful creation, regardless of dietary restrictions.
How Do You Store a Cloud Cake Before Serving?
To keep your cloud cake looking its best:
- Store buttercream cakes in the fridge but bring them to room temperature before serving.
- Fondant decorations should be added closer to serving time to prevent softening from moisture.
- Use a cake box to shield airbrushed designs from smudging or fading.
Proper storage ensures your hard work shines on the big day!
Conclusion and Creative Inspiration
Cloud cakes are more than just desserts—they’re works of art that bring joy to any occasion. Whether you’re making a simple buttercream design or experimenting with fondant and airbrushing, the possibilities are endless.
Recap of Key Techniques
We’ve explored several ways to answer the question, how do you put clouds on a cake? Here’s a quick summary:
- Buttercream Clouds: Fluffy, soft, and easy to create.
- Fondant Clouds: Polished and professional for elegant designs.
- Airbrushed Clouds: Realistic and dreamy for added depth.
- Creative Combinations: Layering techniques for a unique, multidimensional look.
Encouragement to Experiment
Every cake you create is a chance to explore your creativity. Don’t be afraid to mix methods, add your personal flair, and try new techniques. Cloud cakes are versatile, so they fit any theme or celebration.
With this guide, you’re ready to transform your cake into a masterpiece. Let your imagination soar, and enjoy the process of crafting something truly magical!